Nightingale Theme User Guide

Non-urgent advice: License

The Nightingale WordPress theme is released by NHS Leadership Academy. The codebase is released under the GNU General Public License v3.0, unless stated otherwise. The upstream NHS Frontend Library is released under the MIT license, for details please see NHSUK Frontend. The documentation is © Crown copyright and available under the terms of the Open Government License 3.0. Please see the National Archives website for more information on the Open Government Licensing Framework.

This is a guide to using the Nightingale theme with WordPress. If you are new to WordPress, we recommend you first familiarise yourself with using the platform by watching the video guides at WordPress.com

Getting Started

To get started, navigate to your WordPress admin panel, click “Appearance” and “Themes”

Click “Add New” and in the search box enter “Nightingale”. When you can see Nightingale in the results, hover over it and click “Install”. When it has installed, click “Activate”

Your admin panel will now prompt you to install and activate some extra plugins:
– Gutenberg – this is the advanced Gutenberg editor which is required for the next plugin
– NHSBlocks – this is the companion plugin for the theme which opens up a lot of NHS Frontend design elements for you
– Cookie Notice – this is an optional plugin that displays an opt out routine for users wishing to not use cookies when browsing your site.

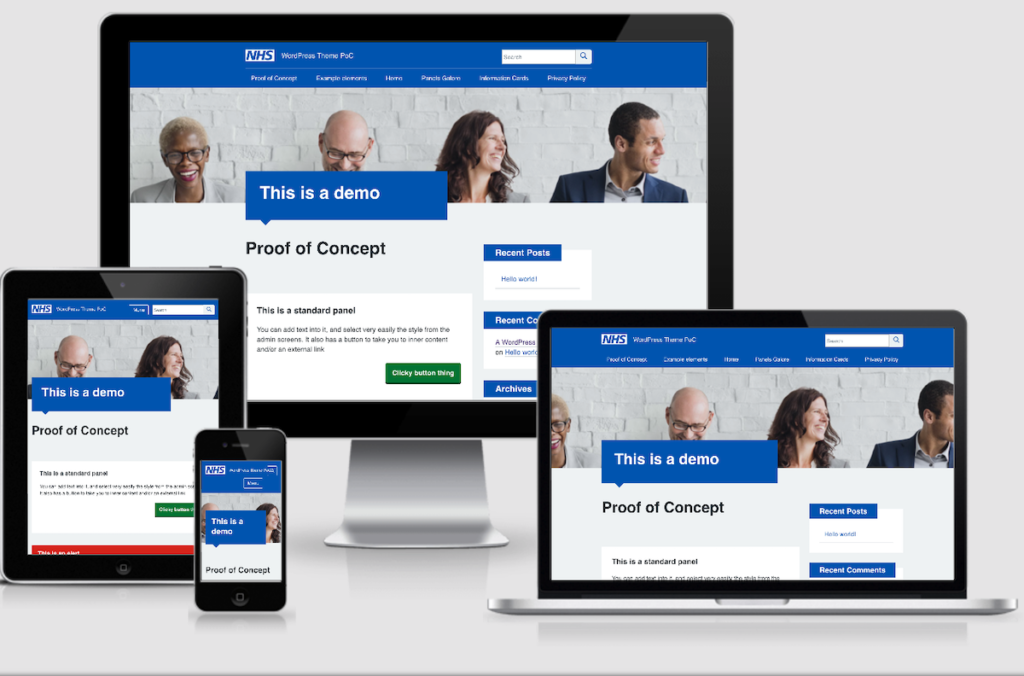
Congratulations! This is now your site, running the Nightingale theme. (Scroll down for some customisation choices)

Nightingale on WordPress

You can customise various features of your theme through your admin panel by visiting Appearance > Customise. These affect how your site behaves and add extra options for you to make your site unique and usable for your visitors.

A responsive, accessible theme for the NHS


You have multiple options for the header.

To begin, choose a header colour:
Solid is an NHS blue (this can be modified in other customisations – for solid blue, please read solid colour), solid, full width region with your logo (sell below) and optionally your organisation name.

Solid Blue (showing transactional logo and search enabled)

If you wish to customise this, you can instead select White Logo Bar – this will then display a full width white region on which you can display your organisational logo (you can upload your logo in Site Identity – see below).

White Logo Bar header (showing transactional logo and search enabled)

In either case, you will have a search box showing on the right hand side of the header, and any menu will be full width and NHS blue.

Next, you can choose whether to show the search box. In most cases, you will want to leave this visible, but if your site is a simple one page or form based deployment, then you may wish to hide the search box.

Having the search available in the header is a common and easily recognised web design pattern that enhances visitor experience by allowing them to jump straight to the information they wish to find. For this reason, by default it is enabled.

This is where you can set your site information.

Logo – if you already have an organisational logo, are using the theme and are not an NHS organisation or if you wish to not have a standard NHS logo displayed, please upload your own organisational logo.

Site Title – This is what will appear next to the NHS logo in a standard header. In a non standard header this will not display, but will show in search results for your site.

Tagline – this is used to populate the smaller font element of the log if you choose Block style logo builder.

Do you wish to use the NHS logo – by default this is set to “No”, if you are setting up an NHS site you will need to visit this to enable it.

Logo Builder – this is where you can modify the look and feel of your sites identity quite significantly.

If you do not have a logo already, then you have some options, all based on the NHS England style guidelines. These broadly break down into whether you wish to display an inline style logo:


(Inline logo on standard background)


(Inline logo on non-standard background)

Or a block style logo:


(Block logo on standard background)


(Block logo on white / non-standard background)

The final option in this second is to upload a site icon – this can be your own image and will be used in browser bar, and also as the shortcut icon if people save your link to their phone or device homescreen.

In this section you can decide whether the sidebar should be on the left or right of your design, and any content of your sidebar will then show accordingly on that side.

You can also decide whether you should show featured images inside the content (featured images will be shown on listing pages which show links to multiple posts / pages regardless of the setting here). If you set this to No, then the image you have chosen as featured image will not be shown separately at the top of the specific page you set it for, only in the multiple listing pages before clicking through.

Here you can set a global theme colour for your site. It has a selection of NHS brand colours to choose from, as well as GDS Black for Government websites. The default is set to NHS Blue. This setting applies site wide.

This is designed for time specific, site wide alerts. Please do NOT use this as a routine display item.

Emergency Alerts are shown in bright yellow and will be at the very top of the page, full width. To activate this, in the Emergency Alert section select Yes under the display option.

You can now add a title, description, link and link title, and a timestamp. All of these fields are optional – you do not need to use all of them, just the ones which make sense for your specific circumstance. The link is a very useful way of using the alert to draw attention, then having another page with full details.

To deactivate your alert, come back to the Customiser and select No under the display option, or go to settings > Nightingale Companion and disable “emergency alert”.

The most common question relating to this theme! You will need to assign menus to your header and footer regions. Without them, your users will get a little lost!

Click View All Locations. You will see two areas – Header and Footer. If no menus are available, click “Add New Menu”

For the top menu, remember only single level will display (this theme has no drop-down functionality), and the limitation is the width of your site – the menu will not wrap.

For the footer menu, again no drop down exists, but this menu will wrap around and make a bigger region to accommodate your links.

For a full tutorial on menus in WordPress, please visit the WordPress menu documentation

It is also worth mentioning that there is a subpage widget available. you should refer to the widgets section below to see how this works to ensure visitors can access all the pages on your website.

Widgets are components you can add to your site. This theme accommodates two widget regions:

Sidebar – we strongly recommend you add “Subpages Widget” here. This gives your users a way to navigate to deeper pages within your site. To add it, click “Add a widget” under Sidebar, then scroll down and select Subpages Widget. Recommended settings are to leave the title blank and tick all four boxes. This will automatically add the parent page as the title for the submenu, and add all child pages (nested up to three levels deep) as self aware expanded areas. i.e. if you had a page with three child pages (A,B and C) and page B had two children (B1 and B2), when a visitor is on the parent page or page A or C, only the three first level pages will show. If they then click to page B, the child pages will show in this menu. This means you can have quite detailed page structures, but the user experience and navigation is kept clean and uncluttered, with only relevant content being shown to them.

Footer – you can add other widgets in here. Entirely up to you what, and how you display them 🙂

You can read more about widgets on the WordPress website.

This is how you can change your site. A standard WordPress installation would be used for a blog, which is why the default is that the homepage shows your latest posts. You can leave it as this if you like, but for most NHS organisations you will want to set your homepage to be a static page.

To do this select “Static Page” and then choose a page from the dropdown. You can then edit that page as you like. If no pages appear in the dropdown, you will need to create one then come back to the Customiser and select it here.

The WordPress guide to creating a static front page.

Likewise, if you do have articles and posts on your pages, you will want to set a posts page. Choose any page which already exists, and WordPress will then add your posts to this page automatically, ordered by most recent first.

This will show a section at the top of the page (dismissable by users) which encourages users to provide feedback on your website and/or service.

N.B. If you have Cookie Notice plugin activated, this also uses the Feedback Alert field, so your text will display next to the Cookie Notice alert.

To use the Feedback Alert, select Yes under display options. You can then add a title, message, text to link and a link to send users to. All of these fields are optional, so you can repurpose the Feedback Alert for other purposes, but if you are asking for feedback then a link is kind of essential 😉

To deactivate the Feedback Alert, come back to the Customiser > Feedback Alert section and select No under display options

This theme includes all styling you will need for a modern, accessible and responsive NHS site. If you do need to add additional stylings, here is where you can do it. Please bear in mind that any custom CSS should retain responsiveness, not interfere with your website’s accessibility and should be to a high standard of code. Anything you add in here will have higher priority than the theme. Use with caution!

The WordPress guide to custom CSS